I was as sick as a dog this week, but I didn’t want to let it end like that. It could give the impression I don’t care and I do. So I hope you appreciate the effort and be kind in your judgement. Learning as I go… 🙂
The full EOS Video is here. To the content owners of the video, if you are not happy with me sharing it this way, please let me know and I’ll be happy to remove it from this Vlog. I am hoping you won’t mind though 🙂
Please rate this post by clicking on the desired star (1 = Awful, 5
= Excellent)
Even though I record these on Thursdays, by the time I published them in YouTube is already Friday, so perhaps I should start calling them the Friday Bike Vlogs 🙂
In this Vlog…
The Devon Coast to Coast ride during Easter with my friends Fernando and Eduardo.
Drone watching
Post about the 14th day of my Camino de Santiago pilgrimage.
Thanks for watching and if you like it, please hit the thumbs up button in YouTube as well as share and like in Facebook and other social media services.
‘Til next week… if it doesn’t rain 🙂
Please rate this post by clicking on the desired star (1 = Awful, 5
= Excellent)
For a while I’ve been willing to write a post about this: Cycling and Music.
First of all, please don’t expect this to be a product review, even though I will be giving you my impression about 2 products I use. I have NO desire to start doing this type of things. All I really want to do is to ride my bicycle and share my experiences with you, but I do think that to share this is relevant as music has been a constant companion for me when I am out riding solo and I know that to be the case for other cyclists too, even though, according to my “research” (what I mean by “research” is the Facebook post I wrote few days ago asking if you listen to music while you ride your bike) most of you don’t. As far as product reviews go, there are good people out there doing product reviews on everything and they can do a much better job than I can, so at the bottom of this post I’ll add some product reviews I found in YouTube.
As this post turned out to be rather long, I decided to put some anchor links so you can jump to the part you may be more interested in.
The first thing that has been inspiring me to write about this is that listening to music has a very positive impact on my performance while cycling. It acts as an additional incentive to keep the cadence high and in sync with the rhythm of the beat. If you are interested in learning the effects of music on physical exercises, give this document a read. I loved the opening sentence: “Despite what you may have heard, the connection between music and exercise didn’t start with Jane Fonda’s dance aerobics or the Sony Walkman portable cassette player. Try 300 B.C. Probably even earlier“. One thing that came to mind is that many young riders might not understand the “Fonda” connection, nor know what a Walkman was (Google them, if you don’t), but since I am old, I do remember them well 🙂 .
Another interesting scientific article I found through Google and that provides metrics and measurements is this one. I talked about this in my last Bike Vlog.
The second thing is that some time ago I participated in a heated online debate about whether it is right or wrong do listen to music while cycling. Even the Major of London, Boris Johnson, got into the discussion stating he would support a prohibition or ban on cyclists wearing headphones after a series of cyclist fatalities in London at the end of 2014. Check these newspaper articles, if interested: The Telegraph, The Independent.
Third… well, I think two are enough, but I also drew inspiration to write this post from the fact that I do spinning and anyone that has ever attended a well delivered spinning session knows how physically demanding it can be and how important the music is. Without music there simply is no spinning.
Another aspect of music while cycling is the environmental noise around you. I would gladly refrain from listening to music if riding around a beautiful forest path to listen to the sounds of the forest, the birds singing and so on, or simply to be in silence. On most urban environments, however, that is not the case and I would much prefer to listen to my favourite tones than to the petrol engines passing by. Even in nature, however, the activity I find myself doing also plays a role whether to listen to music or not. I love to go to the Swinley forest and ride the MTB tracks there while listening to music (typically loud and fast). It becomes like an open air spinning class to me.
Although there is no scientific evidence that suggest that riding with music increases the risk of harming yourself, as this study suggests, I believe that are things for which good sense is better than science.
The funny thing is that when I was out on one of my rides to Windsor some time ago and decided to record the ride and talk over it (my first, not very successful attempt at a Bike Vlog), I felt even more distracted than if I was just listening to music. I’ve not only heard about, but I’ve seen with my own eyes, how distracting it can be when you are riding in a group or with a partner and talking. I’ve seen a few accidents happening under these circumstances. It begs the question, if you should not listen to music while riding solo, should you also stay quiet when riding with someone?
It is logical to think that music can prevent you from listening your surroundings, especially if very loud, but the activity of listening to music does not require a high degree of attention, while talking to someone does and the brain has to multi-task.
In moments where I was cycling in busy environments, such as narrow roads with intense traffic of light and heavy duty vehicles I too have taken my headphone’s earbuds away from my ears.
Now this big introduction got me to the point that I really want to cover, or rather “uncover” in this post: My ears…
Up to an year ago they used to be covered. I had several in-ear headphones which I used while out riding my bicycle. Some of them, like the Sony DR-BT160AS were absolutely brilliant. Great sound quality, light weight and easy to use.
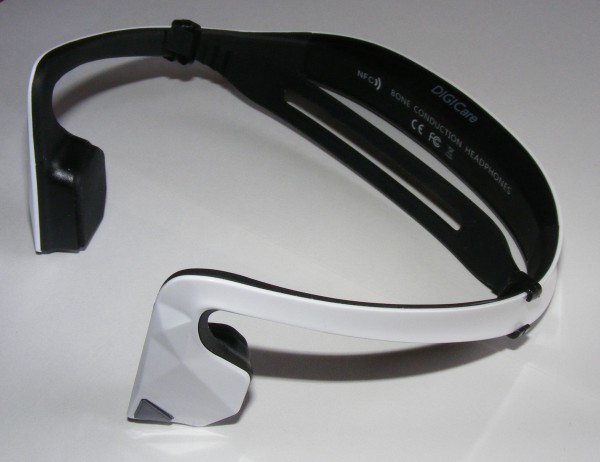
But just over an year ago I discovered that there are such things as bone conduction headphones. Google can do a much better job than I can at explaining to you how they work, but just in case you’re feeling lazy, they are headphones that sit in front of the ear (some sit behind the ear, like the Google Glass) and utilize bone conduction technology to deliver stereophonic sound through the listener’s cheekbones to the inner ear. So, that means unlike conventional headphones there are no earbuds and nothing is on top or “inside” your ears. Therefore your ears are uncovered and open to listen to the sound and noises around you. Of course, if you set your bone conduction headphone to a high volume the sound will tend to overcome the environmental noise, so each person that wants to listen to music while riding has to find their own level of comfort.
At first I was a bit skeptical to be honest and didn’t really want to spent the 80 quid for a good quality headphone. These types of headphones are not as easy to find as the more traditional in-ear ones and I had also read reports the sound quality they produced were nowhere near in comparison to good in-ear headphones. After a while curiosity took over I decided to buy a cheaper Chinese version from eBay.
I end up buying a DIGICare Bone Conduction headphone from this eBay seller for about £50 (prices came down a little since) who had the product available in the UK and shipped it to me rather quickly, but there are many others to choose from, some perhaps even cheaper than what I paid for.
The first thing I think I need to say is that it works, although the hearing sensation is more like the one you would probably get if you touched tiny speakers to your cheekbones. What I mean is that, of course you will feel the vibration coming through your bone, but I believe most of the sound is picked up by your eardrums anyway. The DIGICare headphones come with a hard-shell case which may be useful if you intend to carry it around, in a suitcase or a bag, for example, but I don’t think I’d ever use it as such. Comes also with a pair of earplugs, which I thought it completely defeated the purpose of buying a bone conduction headphone in the first place, since you want to have your ears free. When I tried them is that I understood the effect the sound being carried by the bones had. In essence, one of the applications would be to completely close your ears to external noise and still be able to hear the sound coming from the headphone, which was a cool experiment, but that is what it was for me.
If I had to rate the DIGICare Bone Conduction headphone in categories such as sound quality, comfort and user friendliness I would give the following values out of 10.
Music Sound quality: 5 out of 10.
Like Maghan Trainor, for me is all about the bass. Although the sound is crisp and clear the lack of bass is a bit of a turn down for me. Sound leakage is pretty bad on them, but I believe that this is present in every bone conduction headphone.
Phone call sound quality: 9 out of 10.
I get occasional calls while riding and the audio quality for that is very good. Never had a problem understanding the person on the other side. The MIC appears to work well as well, as the callers on the other side rarely complained about not being able to hear me. The headphone has 2 MICs and one is for noise reduction. I think that in really noisy environments that may still be a problem, but then that would probably be true also if I was talking directly to the phone’s MIC.
Comfort: 6 out of 10.
I found them a bit uncomfortable to use over an extended period of time. While I was riding on the Camino de Santiago pilgrimage last year there were days I wore them the entire day. After a while the pressure they were making on my cheekbones started to hurt a little, a problem you may not have in in-ear headphones as they rest inside the ear. Most helmets I used where no problem with the headphone, except the skiing helmet that I use to ride in the cold, which is closed over the ear.
User Friendliness: 8 out of 10.
I found them really easy to operate. I liked the fact that there were easy access buttons on both sides to pause the music or answer phone calls. The buttons behind the head were a bit more difficult to operate and some of them were, in my opinion, quite important such as the volume keys. To be honest though, they weren’t hard to get used to, once I memorized their position, and they were quite tactile friendly.
Bluetooth connection: 9 out of 10.
No issues here, although they are not super fast to connect. They start breaking at about 7 to 8 m with no obstacles and about 4 to 5 m with walls in between. One benefit present on this headphone and not on the more expensive Aftershokz below is NFC (Near Field Communication), which allows you to connect simply by touching the headphone to your smartphone.
If you are on a budget, want to try bone conduction technology and are OK to trade a bit of sound quality for the safety of having your ears free, than these can be a good option. I have had them for 1 year and have always used them when out on my bike. So far I had no problems with them. The built quality is good and they don’t feel cheap in your hands.
One of the brands I considered before buying the DIGICare product was Aftershokz. I had done a bit of Google research before buying the DIGICare and Aftershokz appeared to be the best “affordable” Bone Conduction headphones one could buy. At the time they were retailing between £80 to £90 and that was more than I wanted to invested just to satisfy my curiosity. This has apparently changed now and recently they came down in price to about the same price range as I originally paid for the DIGICare ones, so I decide to get one to compare. Worth saying that the reason they may have come down is because a new generation is out now (the Bluez 2S) and they might be clearing stock of the old model. Aftershokz also has another, top of the range, model called Trekz Titanium.
I purchased the Aftershokz Bluez 2 from Amazon and paid £56 and the price appears to be have stayed under £60 ever since.
I have been using it for a couple of weeks now and in general the concept is exactly the same as with the cheaper DIGICare ones. The sound quality is considerably better though, with a much better defined bass. I still don’t think it can beat a good in-ear or over-the-ear headphone, but it definitely does a better job than the DIGICare one.
The operation of the Bluez 2 is a bit different than the DIGICare one. There are less buttons to play with.
To start the DIGICare one has a button on the left and a button on the right transducer (the little speaker that sits on your cheekbones). The Bluez 2 has only 1 multifunction button on the left transducer, which you use to play/pause music when it’s playing or to answer a call when the phone rings (amongst a number of other things… amazing how much you can do with a single button)
Yes, I believe it sounds better than the DIGICare one, but compared to a good in-ear headphone, such as the Sony DR-BT160AS they have still some way to go. To be honest, I don’t even know if this technology is able to produce the same quality of sound as a good in-ear or over-the-ear can. It might be a limitation of the technology itself. Sound leakage is heavy at higher volumes as well, but it doesn’t feel to be as bad as with the DIGICare one. I do believe the safety issue makes it worth sacrificing audio quality though.
Phone call sound quality: 9 out of 10.
I believe the call quality is the same as with the DIGICare ones, perhaps slightly better, but to be honest and fair I have not had as many calls in the same varied number of situations that I did with the DIGICare. Like the DIGICare it also has 2 MICs of which one is for noise reduction.
Comfort: 7 or of 10.
I think they are a bit better to use, but again, to be fair and honest I have not used them as much and for as long as I did with the DIGICare ones. What I can tell is that they are a bit smaller and appear to be lighter. Their centre of gravity is also different than on the DIGICare ones, where the battery and controls are on the back, while in the Aftershocks the battery and controls are on the sides. So they much thinner on the back and just a little wider on the sides. I didn’t feel the need to use the rubber strap that came with the Aftershokz, while I do use them on the DIGICare.
User Friendliness: 7 out of 10.
I felt it took a little bit more getting used to the Aftershokz than it did to the DIGICare headphones. To be fair and honest, this could well be because I was already familiar with the controls of the DIGICare. While wearing my helmet I found it harder to reach the side buttons on the Aftershokz than the back buttons on the DIGICare. The multifunction button also takes a bit more getting used to with its 2 second presses and double presses on the same button you use to both answer / end calls and pause / start music. The manual says it is possible to change the equalization of the sound by pressing both volume up and down simultaneously, but I never manage to do it that easily.
Bluetooth connection: 9 out of 10.
No issues here and they are a lot faster connecting to the phone than the DIGICare ones, however the DIGICare has NFC and the Afershokz does not. Haven’t really made the distance test, but I believe they will be at a pair with the DIGICare on this.
So, enough said about what I think of cycling while listening to music and my impressions on both bone conduction headphones. If you can afford to spend the extra cash and want to give it a try, I would recommend you go for the Aftershokz product, but keep in mind there are other brands available in the market too. If you happen to have or get something else and want to share it here with all of us, feel free to leave your comment below.
As I’ve mentioned at the beginning, I don’t want to go into the product review arena, so I have found a few reviews in YouTube that I considered to be interesting to share.
DIGICare:
This was the most positive review I found. I found it, however, to be… “too” positive. It gave me the impression that the person is more interested in driving sales than a true product review, but judge it for yourself: https://www.youtube.com/watch?v=907wKWnWcBQ
Well, that’s it! Hope this can be useful and if it is, please feel free to rate this by clicking on the stars below and share, like and comment in social media.
Make your bones happy.
Note: Links on this page lead to Amazon and eBay product pages. If you decide to buy from them I get a small commission. Feel free to shop around though.
Please rate this post by clicking on the desired star (1 = Awful, 5
= Excellent)
Although this Vlog was recorded Thursday morning as I was putting it together in the evening my video editing software decided to keep crashing (I suspect it was the sync between the 2 cameras that for some reason was causing a problem this time). That made me waste a lot of precious time, hence the Vlog has only been uploaded in the early hours of Friday. Being a Vlogger is harder than I thought 🙂
In today’s Vlog…
A new post about Music and Cycling is almost done
I am going to ride the Devon Coast to Coast route during Easter
Day 14 post of my Caminho de Santiago Pilgrimage by bike.
If you like it, please hit the thumbs-up button in YouTube and share in Social Media.
Thanks!
Please rate this post by clicking on the desired star (1 = Awful, 5
= Excellent)
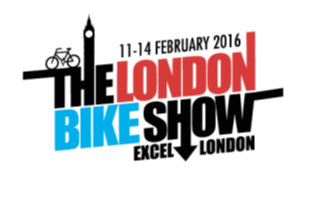
The London Bike Show was the place to be for Cyclists in London last weekend (11th to 14th of February 2016). It was for me a new experience since I had not been to one before. It was a bit of a Marathon to get to the ExCel, with trains, the underground and the DLR, but it was worth it. Since I was covering the show for the Brazilian Cycling Magazine “Revista Bicicleta” I manage to get a press pass to the show.
Now, with the show over, the stats I found on their website indicates that they had over 50.000 visitors and more than 300 different brands in categories such as Clothing, Bicycles, Electronics, Innovation, Performance, Charity, Components, Nutrition, Tourism, Retail, Accessories and others.
There where over 50 different bicycle brands or manufacturers exposing the best of what is available in cycling today. Among them some brands I personally had never heard of (doesn’t mean they are unknown) such as Radon, from Germany and Wilier from Italy. Of course, most of the big names were there too in the likes of Specialized, Cannondale, Cube, Giant, Scott, Boardman, Surly, Orange and many others and they have taken a lot of the space of the show. I felt, however, that there were names missing there also. For instance I don’t recall having seen booths for Fuji and Bianchi in the show, but then I could have missed them, even though I was there for 7 hours (and they are not in the list of brands I got either).
Stealth Bike
My impression was that electric and hybrid bikes were big on this year’s show, but then I didn’t go to last year´s show to make a proper comparison. Every brand in the show had at least 1 electric or hybrid option available and there were those brands that all they do is electric bikes such as Oxigen from the UK and Stealth from Australia.
There was really a bit of everything in the show and sometimes it felt like there was too much of something as well, enough to get a bike loving person somewhat dazzled by what it was on offer, especially those with big pockets. It wasn’t hard to find bikes with £7,000 to £9,000 price tags in them.
The show also brought to stage cycling celebrities like Sir Chris Hoy, the most decorated Olympic cyclist of all time, with six gold medals in the 2004, 2008 and 2012 Olympics and 11 times track world champion. Other celebrities included Greg LeMond, 3 times Tour de France winner, and Steve Peat, a downhill MTB legend.
During the show over 40 of the best freestyle bikers competed for a € 10,000.00 price on an event called “Air to the Throne“. They competed on a purpose built course with some huge ramps that allowed the riders to showcase some mind-blowing tricks for the crowds. It was nice to watch their domain of the bike.
The ticket to the bike show gave also access to 3 more events taking place in the same area: The Triathlon Show, sponsored by Honda, the Outdoor Adventure & Travel Show, sponsored by the Telegraph (a British Newspaper), with lots to see for nature loving camping people and the London International Dive Show, that enabled visitors to actually try the equipment in the big swimming pools built on site.
Although those were nice to see, the bike show was the main event, at least for me. Given that my current interest is in bike touring and long distance cycling, that is where I tried to focus my attention to.
I did look around in the outdoor and adventure area to check the options for tents and other camping equipment which I intend to use in my next long distance trip. Here the highlight goes to the Terra Nova Laser Ultra 1 tent with a total weight of less than 0.5 Kg (1.1 lb). I bought myself an all-in-one stove and cooking pot that I thought was on offer for a good price in the show (that was actually the only thing I bought during the show).
The number of items in the show were in fact so varied that a visitor that didn’t have in mind something specific to look for, could easily be visually overwhelmed by all the information available and by what was on offer.
The show had a large circular test track on one side which enabled the visitor to “test-ride” many of the bikes on display. Of the 7 hours I was there I only tested 3 bikes: 2 electric and an urban one. I didn’t find many touring bike options during the show and that was for me a bit disappointing, but I found interesting innovations in areas such as lighting and efficient use of space and weight, which for those who intend to travel long distances by bike are worth checking.
I was impressed by how far dynamo technology has come since the old days of the mechanical bottle dynamos. Exposure lights had an electromagnetic dynamo + lights kit, the “Revo Dynamo” on show and I was amazed by how little drag the dynamo produced on the wheel to keep the 800 Lumens light on full power. On the same booth they had their battery operated LED lights on display. The strongest one, the “Six Pack MK6“, with a massive 4,000 lumens of power and a battery to keep it going for 4h at full power or 31h at low power (which is actually quite strong). I liked the small OLED displays on the back to indicate their status and remaining power left in the battery. Needless to say all of these don’t come cheap, with the Dynamo kit costing around £300 and the big 4,000 lumens light at around £400. There were several other brands showing their innovations in this area.
AQUAir from NEOS
Topeak brought to their booth some very interesting bicycle bags. From frame and tool bags to a variety of panniers. Things that captured my attention were the a combined water bottle cage with a small tool bag underneath and the air pump designed to fit into the seat post, part of their Ninja series. Another interesting product I’ve seen in this area was a behind the saddle support made by NEOS called AQUAir which allows you to have 2 water bottles, as well as 2 CO2 cartridges, an inflation tube and an extra inner tube all neatly stored behind and under your saddle.
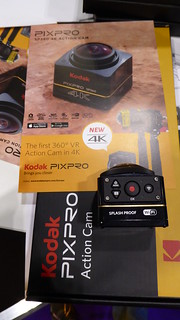
For those that like gadgets, Kodak was showing their latest 360º, 4K action camera. In this area, I missed the presence of players such as GoPRO and Sony, which I believe are market leaders in this segment.
Another area I though was under-represented was the one for special bikes, like Recumbents and Tricycles. Yes, there were a few brands showing their products, but in relation to more conventional types of bikes (Road, MTB, etc) their presence was almost insignificant. In this area one bike that made me turn heads was a rather strange looking tandem from Circe Cycles named Morpheus Aurora. The rear cyclist seats in a conventional saddle and pilots the bike, while the front cyclist seats and pedals in a reclined (recumbent) position and holds a fake handlebar for support. A very interesting concept to say the least.
In terms of accessories I must confess this was an area I didn’t particularly focus on, but I did visit the booths of Continental and Schwalbe on the look for the ideal tyres for my future bike travel plans to Rome. I also found some interesting devices such as LiteLok’s Boa Green lock which, according to them was awarded the highest ever Secure Gold standard by Sold Secure, a British testing agency for security products.
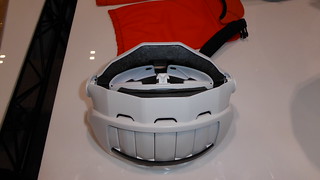
Also worth mentioning is the Overade folding bicycle helmet, which due to its folded size might be an interesting product for those short on space on long bike journeys.
Those of us living in cold winters might also have also been interested in the Virtual Reality Cycling Simulation
game brought by Tacx to be used with their Turbo Trainers (rollers). The online game connects to servers on the internet and allows the rider to compete with other riders (that obviously have the same system) anywhere in the world.
The simulation has several types of tracks available and the resistance in the roller is controlled in accordance to the terrain displayed on the high resolution simulation in the screen in front. I do believe that depending on the size of the screen the simulation has the potential to be very immersive and it is an excellent exercise, as I could myself experience in the 2 times I had a go at it (it was fun).
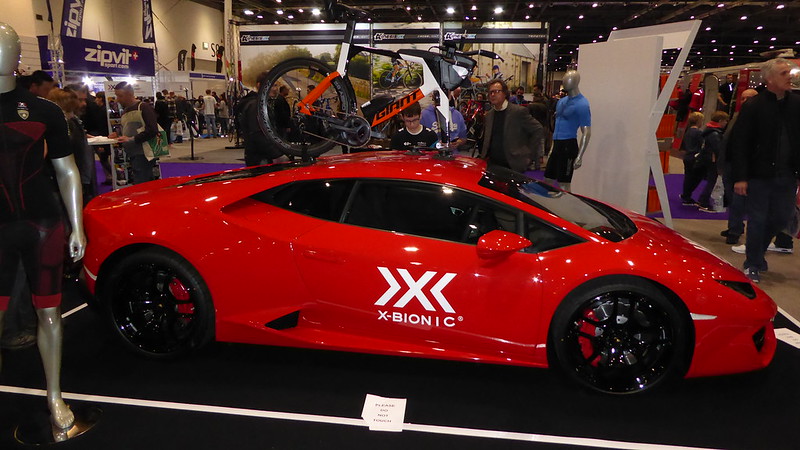
In conclusion, those owners of Basic Lamborghinis will now be happy to know that they can carry their precious bikes on the roof of their vehicles through a support with special suction cups and but if they end up scratching the red paint of the car, please don’t come complaining to me.
Click on the image above to go to the Flickr Album with pictures of the show.
Please rate this post by clicking on the desired star (1 = Awful, 5
= Excellent)
It’s Thursday and as usual time for another Bike Vlog. This one almost didn’t happen though, as I am a bit sick and considered staying home today. The thing is… it was such a nice day to stay home, I couldn’t resist. In this one I am riding my recumbent bike.
In today’s Bike Vlog…
London Bike Show
The future post about the 14th day of my Camino de Santiago Pilgrimage.
The future post about Bone Conducting Headphones.
If you like it, please hit the thumbs-up button and share.
Thanks!
Please rate this post by clicking on the desired star (1 = Awful, 5
= Excellent)
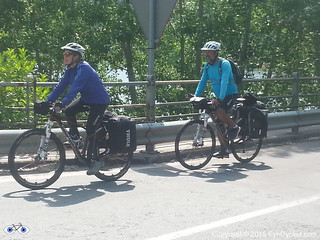
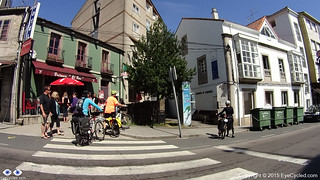
Welcome to the post about the 13th day of our Camino de Santiago Pilgrimage by bike, which happened on the 6th of June 2015. We did this stage of 50.57 Km or 31.4 miles from Sarria to Palas de Rei in 7h and 58 min, of which 4h 2min were of actual moving time.
This was a nice bike riding day in the company of new and old friends. Marcelo, Alice and I left the hostel in Sarria just before 8:30am and went to look for a place to have breakfast along the way out of town. As we were pushing our bikes up the “Rúa Maior” we walked passed a small Café / Restaurant called “La Taza Magica” (The magic cup) and decided to stay there for breakfast. About 15 min. later Fernando arrived coming from Samos where he had spent the night before.
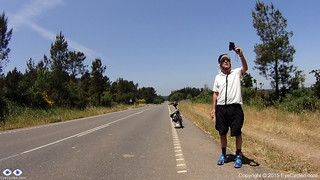
Dr Guy Heron on road selfie time.
After our delicious breakfast we’ve moved on, but made a short stop a few hundred meters away at a public market place were Fernando bought a box of delicious cherries for just € 3.00.
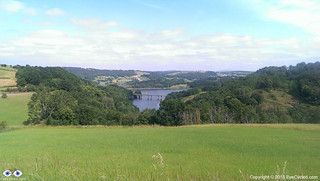
Bridge over an arm of the Belesar reservoir, near Portomarín.Uploading the picture to the EyeCycled Facebook page.
As we were making our way out of town we met Guy, a MD from Sydney, Australia, who was also cycling the Camino all the way from Saint Jean. I understood Guy had purchased sort of a cycling package in Australia which included all hotels along the way and the transfer of his luggage from town to town. All he had to do was to follow the schedule imposed by the travel company that sold the package.
I am mentioning this because it might be of interest to other people to know that there are such options and I believe there are such packages available not only for cyclists, but for walkers too.
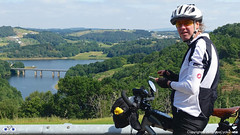
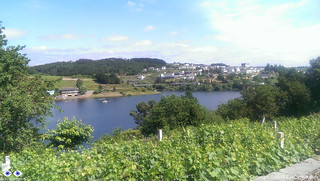
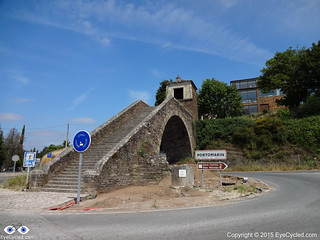
Town of Portomarín in the background
Anyway, Guy joined our little group for this day making it the biggest group I’ve cycled with throughout the entire Camino. It is not easy to cycle in a group as everybody needs to respect each other’s pace, but this day everything worked remarkably well. We took it a bit easy as well, as we were not under any time pressures and we’ve made several stops.
Marcelo and Alice crossing the bridge to Portomarín.
There isn’t, honestly, much to write about. About 3/4 of the 50 Km we did this day were made on the LU-633 (the same one I failed to take when I took the wrong way after O Cebreiro). After leaving Sarria we made a quick stop at a petrol station in Paradela, which is about 16 Km away and then continued towards Portomarín for another 10 Km (about 26 Km from Sarria).
This staircase is actually the sole remaining part of the original 2nd century Roman bridge which was destroyed by Doña Urraca.
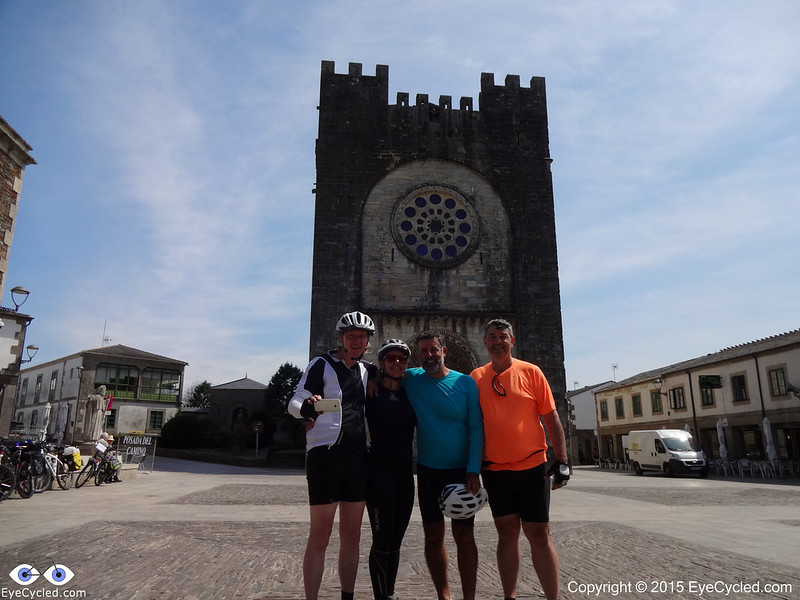
In Portomarín we stopped to stamp our Pilgrims’ credentials, take photos of its “fortress-like” church (Church of San Juan of Portomarín) and to eat something, together with some ice cold Spanish beer. Portomarín is a lovely town and well worth staying, if you can.
The 12th century Igrexa de San Nicolás. From left to right, me, Alice, Marcelo and Fernando.
Our short stop in Portomarín lasted for perhaps 30 min and then we were on the move again. We did another stop at the village of Gonzar, at a road side bar called “Descanso del Peregrino”, for a cold drink and, between the 5 of us, we ate most of the cherries from the box Fernando was carrying since Sarria. We were also joined for a few minutes by 2 female pilgrims from Germany who, upon knowing Guy was a doctor, asked for some medical advice.
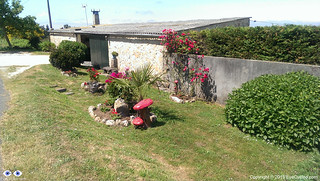
Always something interesting to see
About 5 Km after Gonzar, at a locally known as “O Hospital” the LU-633 appeared to end at a roundabout. We then crossed over the N-540 and took a small, unnamed road, towards Ventas de Narón.
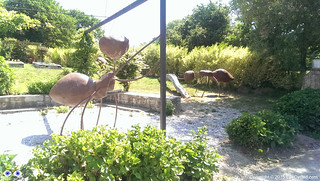
Typical ants along the Camino. You’d be better not to piss them off.
On this small road we crossed through some interesting small villages like Ligonde, Airexe, Portos (with the huge ants sculptures), Lestedo and Os Valos. This was a nice stretch of road with lots of trees and interesting things to see. After Os Valos we took the N-547 all the way to Palas de Rei for another 3 Km. Upon arriving in Palas de Rei, we have first looked into staying at a hostel called Albergue Buen Camino. I didn’t go in, but Fernando and Marcelo did and they came back out not very impressed. We then decided to stay at the municipal hostel of the town, which was €6 for the night. The hostel was clean and good.
Municipal Hostel (Albergue) in Palas de Rei
Since Guy already had accommodation in Palas de Rei as part of his Camino package he didn’t stay with us in the Albergue, but he joined us again the next day on our way to Santiago. This is where this post about the 13th day of the Pilgrimage ends. Short and sweet this time… 🙂 Please indicate if you like it or not by clicking on the stars on the bottom of the post and feel free to leave comments, questions or to get in touch through the contact form.
Click on the picture above to open the Flickr Album for this day.
It’s Thursday and time for another Bike Vlog.
I must confess, when I set out to start Vlogging I was not confident I’d be able to maintain a weekly routine, but so far, so good.
In this Vlog I…
Answer the question that Roberto Moro asked through the contact form in the site
Talk about the London Bike Show this coming Saturday (I’ll be covering it for the blog and would like to know if there is anything you’d like me to focus my attention on)
The future post about the 13th of my Camino de Santiago pilgrimage by bike.
If you like it, please hit the thumbs-up button in YouTube, rate it here and share.
Thanks!
Please rate this post by clicking on the desired star (1 = Awful, 5
= Excellent)
It had been a while since the last time I rode from Bracknell to Windsor. I really missed these 50 K (well, nearly) rides to Windsor.
Those that follow this blog may remember I recorded several rides to Windsor already (this one, this one and this one) and I usually reward myself with a Double Hot Chocolate and something to eat at the Chocolate Theater Café by the Eton Bridge. Sadly the Café seems to have closed for good 🙁 . As it had been a while since my last ride to Windsor I didn’t know about this. That Café used to be a meeting point for cyclists in Windsor…
I’ve still awarded myself with a hot chocolate, but I had to go to the Costa Café crossed the Eton Bridge for that.
On my way to Windsor I crossed through Ascot, had Brunch there with my friend Fernando and then further to Windsor over the Windsor Great Park.
As yesterday was getting too late to publish the return video I am doing it now. I didn’t take the exact same route back, as at the Windsor Great Park I turned right onto Crown State towards Legoland, then took the B3022, Drift Road and Winkfield Lane. The return video is shorter because it’s Time-Lapse only (1 frame every 0.5 seconds).
Hope it was worth your time watching both videos.
If you like this post and the videos please rate using the stars below, share in Social Media (you know, Facebook and stuff) and click the Thumbs Up in You Tube.
Thank you!
Please rate this post by clicking on the desired star (1 = Awful, 5
= Excellent)
Another Vlog today, a bit longer than usual as I again didn’t get to do the spinning class and decided to ride a bit more outside (as I did last week)
The link to the Rise of the Superstar Vloggers is below, but if you live outside of the UK it is likely you will not be able to watch it as the BBC is maintained by TV license payers.